
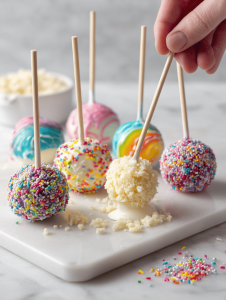
Halloween is not just about costumes and haunted houses. It’s about turning simple ingredients into moments of delight, even if they’re a little messy. Cake pops, with their playful shape and endless decorating possibilities, embody that spirit perfectly. They’re a small project that packs a punch of fun, nostalgia, and creativity.
Why These Cake Pops Keep Calling Me Back
They’re nostalgic, chaotic, and endlessly customizable. Every batch is a little different, and that unpredictability makes each one special. Plus, they’re just plain fun to make and eat, especially with kids or in a group. The bright colors and playful shapes keep the holiday spirit alive long after the last treat.
Inside the Ingredient Cauldron
- White chocolate or candy melts: The shiny, sweet coat that gives the pops their spooky shine. Swap for almond bark if needed.
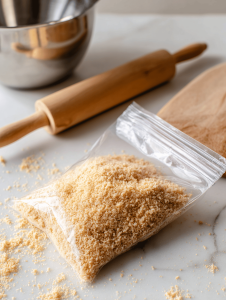
- Graham crackers: Adds crunch and a subtle sweetness; substitute with digestive biscuits for a different texture.
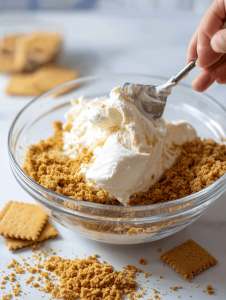
- Cream cheese: Bind the crumbs together with a creamy tang. Cream cheese can be swapped for mascarpone for extra richness.
- Food coloring (orange, black, or purple): Brighten up your coating or decorations with vibrant hues. Gel colors are more vivid but you can use drops for softer shades.
- Decorative sprinkles & edible eyes: Finish with fun, spooky details. Use crushed cookies or colored sugar if sprinkles aren’t available.
Tools of the Trick-or-Treat Trade
- Heatproof bowl: Melts chocolate smoothly without burning.
- Cookie scoop or tablespoon: Portions dough evenly for uniform pops.
- Parchment paper: Prevents sticking and makes cleanup easier.
- Styrofoam block or cake pop stand: Supports decorated pops as they set.
- Decorating tools (toothpicks, small brushes): Adds fine details or quick fixes during decorating.
Step-by-Step to Spooky Sweetness
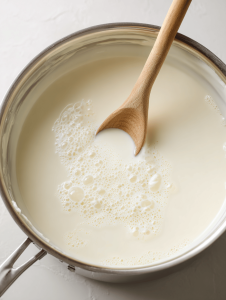
Step 1: Start by melting 200g of good-quality white chocolate in a heatproof bowl over simmering water, stirring until smooth.
Step 2: Crush 150g of graham crackers into fine crumbs; mix with 100g of cream cheese until you get a dough that holds together.
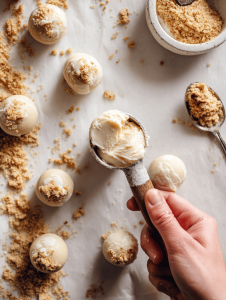
Step 3: Use a small cookie scoop to portion out the dough into balls, about the size of a walnut. Place them on a baking sheet lined with parchment.
Step 4: Insert a lollipop stick into each ball, then chill in the fridge for at least 30 minutes until firm.
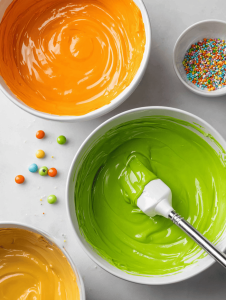
Step 5: Melt 300g of orange and black-colored melts or candy coating in separate bowls, following package instructions.
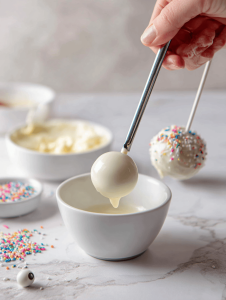
Step 6: Dip each chilled cake pop into the melted coating, covering it completely. Tap off excess and decorate with sprinkles or edible eyes.
Step 7: Place the decorated pops on a styrofoam block or a stand to set, about 15-20 minutes. They should be shiny and firm.
Step 8: Finish with a light spray of edible glitter or a drizzle of contrasting chocolate for extra pop.
Watching for the Perfect Spookiness
- Cake balls should be firm but not dry. Chill if they’re too soft to dip.
- The coating must be smooth and shiny; add a tiny bit of oil if it’s too thick.
- Decorations should be set before the coating hardens for best adhesion.
- Avoid over-dipping to prevent excess drips and uneven surfaces.
Avoid Common Pitfalls in Cake Pop Making
- Chocolate seizes and becomes lumpy.? MELTED CHOCOLATE SEIZES – Reduce heat, add a teaspoon of vegetable oil, stir until smooth.
- Cake balls crumble or fall apart.? CAKE BALLS ARE TOO DRY – Chill longer, or add a splash of cream cheese to the mixture.
- Coating is clumpy or uneven.? COATING IS TOO THICK – Warm it slightly or add a drop of vegetable oil.
- Decorations slide or melt off.? DECORATIONS MELT OFF – Use a quick-drying edible glue or wait until coating hardens.
Halloween Cake Pops
Ingredients
Equipment
Method
- Begin by melting the white chocolate or candy melts in a heatproof bowl over simmering water, stirring until smooth and glossy with a gentle bubbling sound.
- Crush the graham crackers into fine crumbs using a plastic bag and rolling pin or food processor, then transfer to a mixing bowl.
- Add the softened cream cheese to the graham cracker crumbs and knead or stir until the mixture comes together into a cohesive dough that feels slightly sticky and holds its shape.
- Use a small cookie scoop or tablespoon to portion out the dough into balls about the size of a walnut, then place them on a parchment-lined baking sheet.
- Insert a lollipop stick into each ball and chill them in the refrigerator for at least 30 minutes until they are firm and easy to handle.
- Meanwhile, melt the colored chocolate or candy coating in separate bowls according to package instructions, until smooth and fluid.
- Remove the chilled cake pops from the fridge and dip each into the melted coating, turning gently to fully cover the surface. Tap off excess and decorate immediately with sprinkles or edible eyes.
- Place the decorated cake pops upright in a styrofoam block or cake pop stand to set and harden, about 15-20 minutes, until shiny and firm.
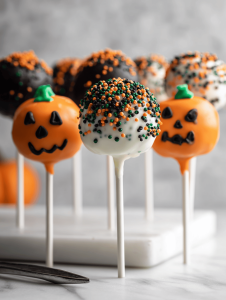
- Optional: Finish with a light spray of edible glitter or a drizzle of contrasting melted chocolate for extra spooky flair.

- Once fully set, enjoy these colorful, fun, and spooky treats that are perfect for Halloween festivities or any playful celebration.

Notes

Hi, I’m Jessica Miller, the creator behind Taste Bud Tyrant. Before you get intimidated by the name, let me explain. I am not actually tyrannical. I am just deeply opinionated about flavor. If a dish is bland, I will say it. If a sauce needs acid, I will add it. If something can be bolder, brighter, or better balanced, I will not stop until it is.
